Assembling a trampoline is never as tough as building a car. However, this work still takes 1-2 hours to finish. If it doesn't go well, more time may be wasted looking for solutions from the manual.
Can you pay someone to put together a trampoline?
Yes, but it doesn’t seem necessary! Besides, working together is such a great bonding project. Believe it, your little sweeties would be happier when jumping on the trampoline that they've seen how it built from scattering parts to a standing one!
Then, the one problem you need to figure out is to make the trampoline assembly go smoothly, without wasting an extra 50% of the time. And this guide with all the mistakes that you may encounter during the trampoline assembly is going to help!
What’s in this guide (quick jump to):

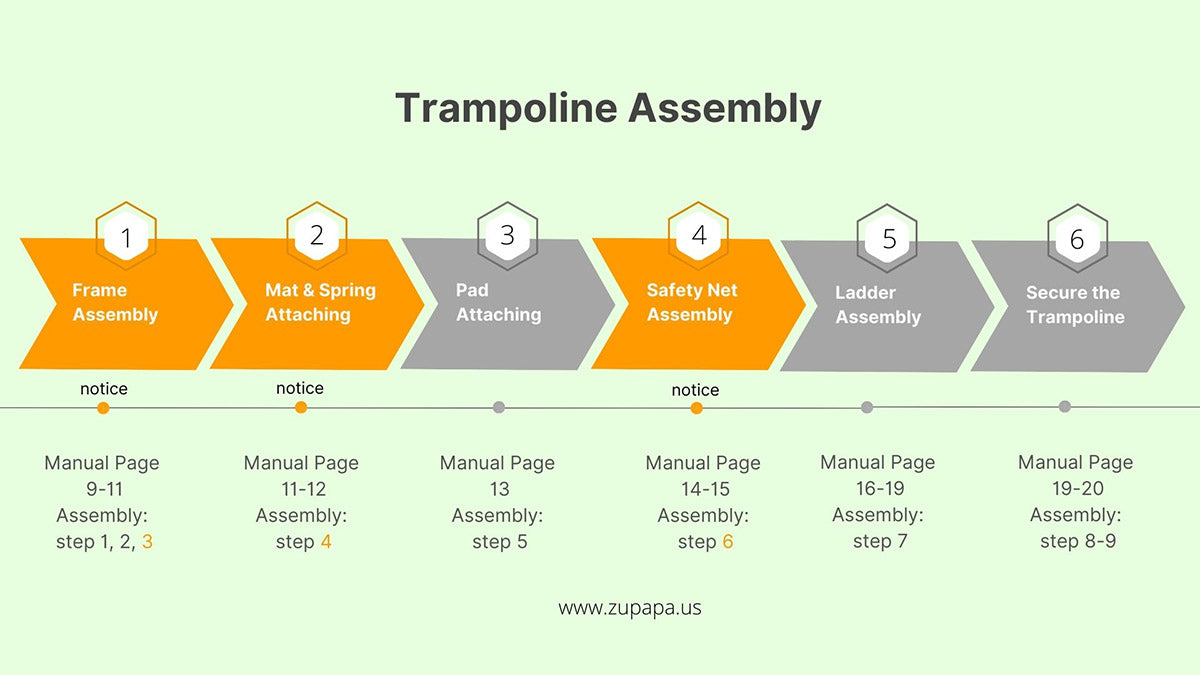
The highlighted steps in the above checklist are where mistakes may happen. Please pay extra attention to them during your assembly.
Download the entire Trampoline Assembly Manual.
5 Painful Mistakes to Avoid While Assemble A Trampoline
1. Start the Setup Directly without Checking All the Parts

Three boxes containing trampoline parts that will be sent to you.
A rule of thumb, start the installation when all parts are ready! Three boxes containing trampoline parts will be sent to you. Imagine how bad an experience it is when you are halfway through the installation, and you find out the trampoline is missing a leg!
However, you can avoid such annoyance at the very beginning. Check all the parts and ensure they are in brand new and good condition. All the parts (#1-18) included in your package are shown on pages 6-7 of your manual, including the mat, pole, net, springs, and also the free tools to tighten the springs up, etc.
Contact us at your earliest convenience whenever parts are missed or damaged. In such a case, we at Zupapa will provide free parts (and without asking for shipping fees) upon your request.
2. Mistakenly Believe that There is Only One Kind of Component Making Up the Ring

The entire frame of the trampoline is composed of the leg base (#5), top rails (#4), and the vertical leg extensions (#6) in between. Inserting the leg extension (#6) into the leg base (#5) is easy, and almost no one makes mistakes in the process.
However, you need to pay attention to the ring assembly followed. The entire ring is composed of 2 shapes of components, including the one with leg sockets (#3) for further attachment of the base legs and another ring with two protrusions (#4) for attachment of the two former types of components.
If you mistakenly think that the ring with leg sockets (#3) should correspond one-to-one with the leg bases (#5), you will find that they do not fit. The distance between two upper points of the leg base (#5) is greater than the length of the ring segment (#3). Therefore, pay attention to it and do follow the steps shown in the manual when installing the ring.
3. Install the Spring Hooks in the Opposite Direction & Install Them One by One

Going after the frame assembly is the mat (#1) and spring (#11) attaching. We’re sure to say almost everyone goes smoothly when attaching the mat (#1). However, when it comes to the spring (#11) attaching, there are two often-to-encounter mistakes:
Mistake 1 — Mistakenly attach the smaller hook of the spring (#11) to the edge of the frame rails.
Mistake 2 — Attach the spring (#11) one by one, either clockwise or anticlockwise.
You can get the correct way to assemble the spring below.
How to Put Springs on A Trampoline?
The end with the smaller hook should always face toward the center of the mat (#1) while the other end with the bigger hook should be hung to the edge of the frame rails.
Never attach the springs (#11) one by one. As shown, the first 4 springs should go to the frame at 3, 6, 9, and 12 o'clock, then the next 4 springs should be in the middle of every two springs which have been attached before, and then the next 8 springs... till you finish attaching all the springs.
Please turn to the Page 11-12 of the manual, you’ll find the RIGHT WAY to avoid each mistake.
How to Tighten Trampoline Springs?
For safety concerns, never use your hands to tighten the trampoline springs. In your package, Zupapa offers free Spring Loading Tools (#12) for you to tighten the springs with ease.
First, hook the end of the spring with the most enclosed hook on the D-ring of the trampoline mat. Then, use a spring loading tool to pull the hook on the opposite end of the spring to engage the hole in the spring frame.
How to Remove the Springs from the Frame?
If you have installed the springs one by one and find that the remaining springs are too far from the frame to fit, you may need to remove the springs. Follow the opposite steps of the installation to remove the springs with the help of your tool. First, remove the trampoline hook from the frame and then take it off the trampoline mat.
4. Slide and Clamp the Pole One by One When Assembling The Trampoline Enclosure

The installation of the safety net (enclosure) includes two parts: slide the poles (#7 & #8) into the safety enclosure mesh pole jacket (#9) in turn, and then clamp the poles to the legs bases (#5 & #6).
How to Assemble Trampoline Enclosure?
First, connect the upper part of the pole (#7) to the lower part (#8) firmly, then dress each of the entire poles in foams, and finally slide the poles with foams into the mesh pole jacket (#9).
Do not start the pole connection work until all poles have been sleeved, or you will find it is hard to stand high to insert the pole into the net.
5. Let the Clamp Set Facing Outwards

Once you have made sure that all the poles have been sleeved, it's time to fix the lower net poles (#8) to the frame leg bases (#5 & #6) with the Clamp Sets (#10).
How to Clamp the Trampoline Poles?
First, start from top to bottom with one Set, then it would be easier to attach the other Clamp Set on the bottom. In this way, you also do not need a partner to hold the pole.
Second, make the Clamp Set face inwards. This makes the whole process easier. And it’s also for your kids' safety when they're walking around the trampoline.
3 Additional Tips on Assembling A Trampoline
1. Use the Free Tools Provided in the Package
To help our dear customers to assemble and tighten up the springs with ease, Zupapa offers a free springs tool (#12) and a free spanner (#18) in each trampoline order. We highly recommend that you use them to install your trampoline more smoothly.
2. Think About the Orientation of the Door in Advance
The zipper door on the net mesh (#9) should be between any of the two formed net poles for easy in/out. It is recommended to keep the door facing your home door or yard door, so that when you want to jump, you can achieve that as soon as possible!
If you’re particular with aesthetics, it would be better to ensure the door is facing towards the Zupapa Logo on the mat.
3. Tape The Joint of Two Foams
If possible, we highly recommend you tape each joint of the foam where the upper poles (#7) and the lower poles (#8) meet — it fully protects the foam from tearing when you take down the trampoline.
Watch A YouTube Video on Trampoline Assembly
You now know the mistakes that may happen during your assembly, we believe you can finish your installation very well. If you still require more help, you can watch the less-than-two-minute assembly video below, which was created by our dear customer who bought our best 15 FT Trampoline.
Conclusion
Overall, you do not need to be particularly handy when installing a trampoline. Reading the specific chapter in the manual before starting to work would do a great favor. You can also get a working one quickly by reading what this blog suggested: avoid the 5 painful mistakes, follow the 3 practical tips, and watch the tutorial video. Believe us, they will surely help you "do the right things in the right way" during the whole assembly process!
By the way, we are always open to feedback and suggestions. If you have some more smart tips (including product design) to make the assembly of a trampoline quicker and easier, please feel free to email official@zupapa.us, we will take them seriously. For any adopted suggestions, we will keep the idea provider in the loop and send gifts to show our great gratitude!